Storm拓扑的并行

这周在做下载数据实时分析,使用的是storm这个流处理框架。期间对并行相关的几个概念不甚清楚,在项目的wiki里面找到这么一篇文章,Understanding the parallelism of a Storm topology,讲得还是蛮清楚的。

worker process, executors and tasks

在storm集群中,运行拓扑需要下面三个不同的entities: 1. Worker processer 2. Executors (threads) 3. Tasks

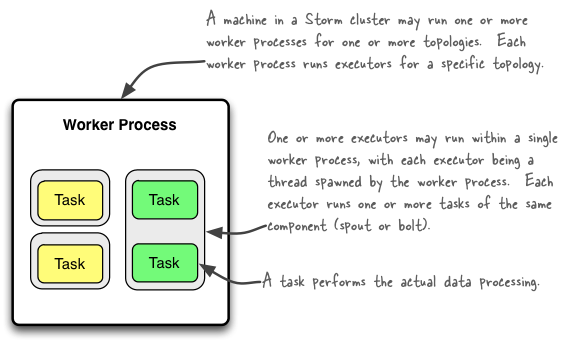
他们之间的关系见下图:

Alt text

worker process负责执行拓扑的一个子集。worker process属于某个特定的拓扑,用于执行该拓扑的一个或多个组件(spouts或者bolts)的一个或多个executors。在storm集群中,一个运行的拓扑由运行在多台机器上的许多process组成。

executor是由worker process产生的一个thread。它负责执行同一个组件(spout或者bolt)的一个或多个task。

task负责实际的数据处理——each spout or bolt that you implement in your code executes as many tasks across the cluster. 在拓扑生命周期内,每个组件的task数目是不变的,不过executor数目是随时变化的。这意味着有下面的条件成立:#threads <= #tasks。默认情况下,task数与executor数一致,即每个thread对应一个task。

配置拓扑并行度

注意,在storm中术语“parallelism”专用来描述所谓的parallelism hint,也就是一个组件的初始executor(threads)数目。在本文中,我们使用一般意义的“parallelism”来表示executors,worker processes和tasks数目。

接下来的部分会介绍不同的配置选项以及如何在代码中设置。设置方法有很多种,这里只是给出了一部分。Storm currently has the following order of precedence for configuration settings: defaults.yaml < storm.yaml < topology-specific configuration < internal component-specific configuration < external component-specific configuration.

Number of worker processes

Number of executors(threads)

Number of tasks

下面是如何设置的一段代码示例:

topologyBuilder.setBolt("green-bolt", new GreenBolt(), 2)
                             .setNumTasks(4)
                             .shuffleGrouping("blue-spout);

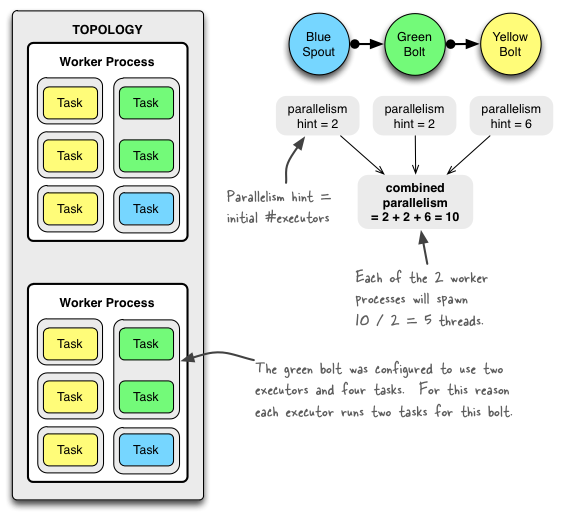
上面的代码会运行GreenBolt,初始executor数目为2,带有4个相关的tasks。每个executor(thread)会执行两个task。如果没有明确配置task数目,默认每个executor一个task。

Example of a running topology

下面给出一个简单的拓扑在实际中是什么样的。这个拓扑由三个组件构成:一个BlueSpout以及两个GreenBoltYellowBolt。组件间的连接方式是BlueSpout将它的输出发给GreenBoltGreenBolt再将输出发给YellowBolt

Alt text

The GreenBolt was configured as per the code snippet above,而BlueSpoutYellowBolt只设置了parallelism hint(executor数)。相关代码如下:

Config conf = new Config();
conf.setNumWorkers(2); // use two worker processes

topologyBuilder.setSpout("blue-spout", new BlueSpout(), 2); // set parallelism hint to 2

topologyBuilder.setBolt("green-bolt", new GreenBolt(), 2)
                             .setNumTasks(4)
                             .shuffleGrouping("blue-spout");

topologyBuilder.setBolt("yellow-bolt", new YellowBolt(), 6)
                             .shuffleGrouping("green-bolt");

StormSubmitter.submitTopology(
                "mytopology",
                conf,
                topologyBuilder.createTopology()
        );

当然了strom也有其他的选项用来控制拓扑的并行程度,包括: * TOPOLOGYMAXTASK_PARALLELISM:该选项设定了单个组件能产生的executor的数目上限。当在本地模式中运行拓扑的时候,主要用来限制生成的线程数。可以通过选项Config#setMaxTaskParallelism()设置。

如何修改运行中拓扑的并行度

Storm有一个有趣的特性,就是不必重启集群或者拓扑,就可以调整worker process和/或者executors数目。这称为rebalancing。

rebalance一个拓扑有两种方式: 1. 使用Storm web UI 2. 使用CLI工具,具体如下

这里是使用CLI工具的示例:

# Reconfigure the topology "mytopology" to use 5 worker processes,
# the spout "blue-spout" to use 3 executors and
# the bolt "yellow-bolt" to use 10 executors.

$ storm rebalance mytopology -n 5 -e blue-spout=3 -e yellow-bolt=10

2014-04-19@桃园公寓

kafka 协议阅读笔记

最近看kafka c++客户端librdkafka源码,看到消息生产部分,了解了下kafka的协议设计,A Guide To The Kafka Protocol,做了些笔记。


overiew

  1. Metadata —— 描述当前可用brokers,它们的host和port信息,以及broker持有的partions
  2. Send —— 向broker发送消息
  3. Fetch —— 从broker获取消息,数据、集群元数据和topic offset信息
  4. Offsets —— 获取指定topic partition可用offset信息
  5. Offset Commit —— 确认一个consumer group的offset集合
  6. Offset Fetch —— 获取一个consumer group的offset集合

Preliminaries

网络

kafka协议是TCP上的二进制协议。请求响应对。大小指定。链接建立和断开不要求握手机制。客户端需要维持到多个broker的链接,因为数据分区放在了不同的broker上。某个客户端没必要维持到broker的多个连接。

server保证单个TCP链接上的请求响应是有序的。

request是大小受限的,超过限制的请求会导致socket断开。

分区与bootstrapping

topic被分到数目预先设置的partition,每个partition根据复制系数N进行复制。topic partition 以 0,1,…,P 编号。

客户端控制数据发送到哪个partition。

数据发送和获取请求必须发给作为指定partition leader的broker。

所有的kafka broker都能响应metadata请求:有哪些主题,这些主题有哪些分区,这些分区的leader broker是谁以及这些broker的host 和port信息是什么。

客户端没必要轮询集群是否有变化;一直获取后缓存元数据直到发生错误暗示元数据过期:1)无法跟指定broker通信的socket错误;2)某个请求响应错误代码暗示当前borker不再持有请求数据的分区

  1. 遍历”bootstrap” kafka url 列表,直到找到可以连接的。获取集群metadata
  2. 处理 fetch或者produce请求,根据发送或者获取的主题分区访问相应的broker
  3. 如果发生错误,刷新元数据并重试

librdkafka 还是会定时刷新元数据

分区策略

kafka中进行数据分区有两个作用:

  1. 在brokers中间平衡数据和请求负载
  2. It serves as a way to divvy up processing among consumer processes while allowing local state and preserving order within the partition. We call this semantic partitioning. 语义分区

在所有的broker中间对请求做round robin处理。如果producer数超过broker数,客户端随机选择partition。这种策略会带来更少的TCP链接。(为什么?)

语义分区就是根据消息里的某个key来确定消息发送到哪个partition。

批处理

消息批处理可以跨越多个topic和partition,也就是说一个produce请求中可能包含发给多个partition的数据;一个fetch请求可能从多个partition中获取数据。

版本与兼容性

kafka协议是向后兼容的。 Our versioning is on a per-api basis, each version consisting of a request and response pair. (每个API都有版本?)每个请求包含API key用于指明使用的API,以及版本号指明请求格式和期望的响应格式。

server会拒绝掉协议不支持的请求,响应是严格按照请求中所暗示的。

协议

协议基本类型

固定宽度
int8, int16, int32, int64 —— 指定宽度的有符号数,以big endian order存储

可变长度
bytes, string —— 这种类型由表示长度N的有符号整数以及N个字节的内容组成。长度-1表示null。string的长度类型是int16,bytes的长度类型是int32。

数组
用于处理重复的结构。包含长度N,后续N个重复的structure,这些structure可以由其他的基本类型构成。

common request and response structure

RequestOrResponse => Size (RequestMessage | ResponseMessage)
    Size => int32
描述
MessageSize 给出后续请求或者响应消息的大小,以字节为单位。
RequestMessage => ApiKey ApiVersion CorrelationId ClientId RequestMessage
    ApiKey => int16
    ApiVersion => int16
    CorrelationId => int32
    ClientId => string
    RequestMessage => MetadataRequest | ProduceRequest | FetchRequest | OffsetRequest | OffsetCommitRequest | OffsetFetchRequest
描述
ApiKey 数值id表明正被调用的API(例如,元数据请求,produce请求,fetch请求等)
ApiVersion api的数值version number。server根据版本号作出相应格式的回复
CorrelationId 用户提供的整数,server原样返回,用于在client和server之间匹配消息
ClientId 用户提供的客户端标识
Response => CorrelationId ResponseMessage
    CorrelationId => int32
    ResponseMessage => MetadataResponse | ProduceResponse | FetchResponse | OffsetResponse | OffsetCommitResponse | OffsetFetchResponse

messageset 是带有offset和size信息的消息序列。This format happens to be used both for the on-disk storage on the broker and the on-the-wire format.message set 还是kafka中消息压缩的单位。MessageSets 跟其他数组元素不一样的地方在于开头不是表示长度的size域。

MessageSet => [Offset MessageSize Message]
    Offset => int64
    MessageSize => int32
    Message => Crc MagicByte Attributes Key Value
        Crc => int32
        MagicByte => int8
        Attributes => int8
        Key => bytes
        Value => bytes
描述
Offset 在kafka中是作为 log sequence number。当producer发送消息的时候,它并不知道offset,可以填充任何值
Crc 后续的消息bytes的CRC32,用于校验broker和consumer中消息的完整性
MagicByte 用于向后兼容的version id
Attributes 存放消息的元数据属性的字节。最低两位表示消息的压缩编码。其他置零。
Value 实际的消息内容,以opaque byte 数组的形式。
Key 可选的message key用于partition。可以为null

kafaka压缩的不是单条message而是message set。

Compression Codec
None 0
GZIP 1
Snappy 2

The APIS

Metadata API

  1. 存在哪些topic
  2. 每个topic有多少partition
  3. 每个partition的leader是那个broker
  4. 每个broker的host和port 是什么

这是唯一一个可以发给集群中的任意broker的请求。

client可以只请求部分topic的元数据。

返回的元数据是partition级别的,按topic分组。对于每个partition,元数据包含 leader信息,所有的replicas以及当前处于 in-sync 状态的replicas列表。

MetadataRequest => [TopicName]
      TopicName => string
描述
TopicName 请求指定topic的元数据。如果为空产生所topic的元数据
MetadataResponse => [Broker][TopicMetadata]
    Broker => NodeId Host Port
        NodeId => int32
        Host => string
        Port => int32
    TopicMetadata => TopicErrorCode TopicName [PartitionMetadata]
        TopicErrorCode => int16
        PartitionMetadata => PartitionErrorCode PartitionId Leader Replicas Isr
            PartitionErrorCode => int16
            PartitionId => int32
            Leader => int32
            Replicas => [int32]
            Isr => [int32]
描述
Leader 作为某个partition leader的broker的node id。如果在leader选举中,id = -1
Replicas 作为当前partition leader 的slave的 node 集合
Isr caught up leader 的 replicas 子集合
Broker kafka broker的nodeid、hostname和port
ProduceRequest => RequiredAcks Timeout [TopicName [Partition MessageSetSize MessageSet]]
    RequiredAcks => int16
    Timeout => int32
    Partition => int32
    MessageSetSize => int32
描述
RequriedAcks 这个域表明server在给请求相应之前要接收到多少个确认。如果是0,server不会发送任何响应(这是唯一一种server不会响应请求的情形,如果是1,server会等到数据写到本地再发送响应。如果是-1,server会阻塞直到消息被所有的sync replicas确认。对于任何大于1的情形,server将会阻塞直到相应数目的确认产生(不过server不会等待超过 in-sync replicas 数目的确认)
Timeout server等待RequireAcks中指定数目acknowledge超时时间,以毫秒为单位。这个超时时间不是针对请求时间:1)不包括网络延时,2)计时器在请求开始处理时启动,这样一来如果server负载高导致很多请求排队,那么等待时间时不会计算在内,3)we will not terminate a local write so if the local write time exceeds this timeout it will not be respected。要得到严格的超时时间,使用socket timeout
TopicName 数据发送的主题
Partition 数据发送的分区
MessageSetSize 后续message set的大小,以字节为单位
MessageSet 标准格式的消息集合
ProduceResponse => [TopicName [Partition ErrorCode Offset]]
    TopicName => string
    Partition => int32
    ErrorCode => int16
    Offset => int64
描述
Topic 响应相应的主题
Partition 响应相应的分区
ErrorCode 来自分区的错误,如果有的话。Error是跟分区对应的,这是因为指定的分区不可用或者在不同的host上,但是其他的分区可能成功接受到produce 请求
Offset 赋给追加到这个partition的message set的第一条消息的offset

Constants

Api Keys

API name ApiKey Value
ProduceRequest 0
FetchRequest 1
OffsetRequest 2
MetadataRequest 3
LeaderAndIsrRequest 4
StopReplicaRequest 5
OffsetCommitRequest 8
OffsetFetchRequest 9

2014-04-11@迈科龙

go语言闭包

闭包的概念、形式与应用一文中,有一总结“对象是附有行为的数据,而闭包是附有数据的行为”。

先看两个例子——

第一个例子来自Go中的闭包

package main 
import "fmt"

func closure01() func(int) int {
    sum := 0
    return func(x int) int {
        sum += x
        return sum
    }
}

func main() {
    myfun := closure01()
    for i := 0; i < 3; i++ {
        fmt.Println(myfun(i))
        //调用 myfun 会执行closure01()内部的匿名函数,i作为参数传递给该函数的变量x,sum就是“附有的数据”
    }
}

输出:

[root@datanode1 demo]# go run closure_demo.go 
0
1
3

上面这个例子是将变量,放到引用环境中。再看一个例子,将函数放到引用环境中(其实在go中,函数也是一种变量,即函数是一阶值)。

package main 
import "fmt"

func closure02(fn func(int, int) int) func(int) int {
    tmp := 1
    return func(x int) int {
        return fn(x, tmp)
    }
}

func add(x int, y int) int {
    return x + y
}

func sub(x int, y int) int {
    return x - y
}

func main() {
    // closure02 稍微复杂一点 —— 它的参数中有一函数类型的变量fn,在内部的匿名函数里调用了fn, 这里嵌套了一层
    myadd := closure02(add)
    fmt.Println(myadd(1))
    // 调用 myadd 会执行 closure02 内部的匿名函数,匿名函数又会执行作为参数传递的函数fn, 函数fn的参数x就是myadd(1)中的1,参数y就是附有数据tmp,所以最终结果就是 x(1) + y(tmp=1) = 2
    mysub := closure02(sub)
    fmt.Println(mysub(1))
    // 同上
}

输出:

[root@datanode1 demo]# go run closure_demo.go 
2
0

为什么要考虑函数放在引用环境中这种场景呢?在应用中,不同的url通常是由不同的handler处理,这一步是通过函数http.HandleFunc定义的

func HandleFunc(pattern string, handler func(ResponseWriter, *Request))

我们所要做的就是针对不同的pattern,定义不同的handler就行了,很简单有木有。问题是如果我们的handler函数不是这种类型func(ResponseWriter, *Request),该怎么办呢?

例如,我们在logic包中有这样一个处理器MyHandler

func MyHandler(req *protocol.ClientRequest, w http.ResponseWriter, r *http.Request, ch chan string) 

解决的方式就是定义一个闭包makeHttpHandler,将我们的处理器MyHandler作为参数fn放到引用环境,在内部匿名函数中调用处理器fn

func makeHttpHandler(
    fn func(*protocol.ClientRequest, http.ResponseWriter, *http.Request, chan string), 
    reqId string, 
    ch chan string
) http.HandlerFunc {
    return func(w http.ResponseWriter, r *http.Request) {
        ...
        fn(someClientRequest, w, r, ch)
        ...
    }
}

这样一来,就可以像通常那样来定义处理器了

http.HandleFunc("/some/pattern", makeHttpHandler(logic.MyHandler, "myString", myChan))

2014-03-21@迈科龙

gdb查看core文件

嗯,有一阵子没写日志了。

曾经有很长一段时间,其实也就是今天之前啦,在用gdb调试core文件时,仅限于通过bt查看下崩溃时的堆栈。这两天,服务常常挂掉,查看堆栈发现是rapidjson在解析时断言失败导致的。于是想要查看接收到消息,以前的做法是,把消息记录到日志中,之后再根据崩溃的时间点去日志中找(掩面)。之前也有想过,既然core文件中记录了调用堆栈,那么记录调用时参数的值,也是合情合理的啊。

今天在网上找了些资料,算是大概弄明白了~过程大致如下:

  1. [user@xxxxxxx bin]$ gdb mybin core.25756
  2. 打印调用堆栈
     (gdb) bt
     #0  0x0000003ddae32885 in raise () from /lib64/libc.so.6
     #1  0x0000003ddae34065 in abort () from /lib64/libc.so.6
     #2  0x0000003ddae2b9fe in __assert_fail_base () from /lib64/libc.so.6
     #3  0x0000003ddae2bac0 in __assert_fail () from /lib64/libc.so.6
     #4  0x0000000000419aa4 in FindMember (this=0x7fbdcc329378, request=0x7fbdcc327980, root=...) at ../../rapidjson/include/rapidjson/document.h:620
     #5  operator[] (this=0x7fbdcc329378, request=0x7fbdcc327980, root=...) at ../../rapidjson/include/rapidjson/document.h:233
     #6  Head::parse_head (this=0x7fbdcc329378, request=0x7fbdcc327980, root=...) at Head.cpp:51
     #7  0x000000000041009f in Request::parse_msg (this=0x7fbdcc329370, request=0x7fbdcc327980, num_record=@0x7fbddbbb2b68) at Request.cpp:41
     #8  0x000000000041baf8 in HttpHandler::handle (request=0x7fbdcc327980, a=<value optimized out>) at HttpHandler.cpp:114
     #9  0x000000000042b010 in _evhtp_request_parser_fini ()
     #10 0x000000000043010b in htparser_run ()
     #11 0x000000000042bdb1 in _evhtp_connection_readcb ()
     #12 0x00007fbddefe1ee5 in bufferevent_readcb (fd=<value optimized out>, event=<value optimized out>, arg=0x7fbdcc0d47a0) at bufferevent_sock.c:186
     #13 0x00007fbddefd9e0c in event_process_active_single_queue (base=0x7fbdcc0008f0, flags=0) at event.c:1350
     #14 event_process_active (base=0x7fbdcc0008f0, flags=0) at event.c:1420
     #15 event_base_loop (base=0x7fbdcc0008f0, flags=0) at event.c:1621
     #16 0x0000000000431152 in _evthr_loop ()
     #17 0x0000003ddb6077f1 in start_thread () from /lib64/libpthread.so.0
     #18 0x0000003ddaee5ccd in clone () from /lib64/libc.so.6
  3. 跳到堆栈中某一层,这里是第7层
     (gdb) f 7
     #7  0x000000000041009f in Request::parse_msg (this=0x7fbdcc329370, request=0x7fbdcc327980, num_record=@0x7fbddbbb2b68) at Request.cpp:41
     41      Request.cpp: 没有那个文件或目录.
             in Request.cpp
  4. 打印变量值str_msg
     (gdb) p str_msg         
     $8 = 
         "{\"ex\":[],\"pr\":[{\"e\":1394130724051,\"s\":1394130632364,\"c\":1,\"i\":1394130724052,\"p\":[{\"n\":\"desktopspeedup.DesktopSpeedUpAnimationActivity\",\"d\":8116,\"ps\":1},{\"n\":\"manage.AccelerateActivity\",\"d\":24918,\"ps\":"...

如果字符串太长,结尾以...表示,可以通过set print elements 0调整

2014-03-10@迈科龙

libevhtp使用小记

半个月前,上线一个收集服务,启动不了,发现是端口被占用。进一步检查后,发现大量的连接处于 TIME_WAIT 状态,大致如下

 Total: 13420 (kernel 14354)
 TCP:   90360 (estab 13061, closed 69056, orphaned 8192, synrecv 0, timewait 69051/0), ports 40510

 Transport Total     IP        IPv6
 *         14354     -         -
 RAW       0         0         0
 UDP       6         1         5
 TCP       21304     20053     1251
 INET      21310     20054     1256
 FRAG      0         0         0

当时共启动了4个收集服务进程,通过前端的nginx做均衡,并且收集进程和nginx运行在同一台物理机上。那些处于 TIME_WAIT 状态的连接都是收集服务和nginx之间的连接。根据TCP协议,这说明是server主动断开了链接。

收集服务使用是spserver框架,对于该框架这里有一个结构层面的介绍从spserver看HS-HA模式

翻了源码,在文件speventcb.cpp找到回调函数void SP_EventCallback :: onWrite( int fd, short events, void * arg ),发现其在处理完请求之后,调用了函数doClose(line259)。

254         if( 0 == ret && session->getOutList()->getCount() <= 0 ) {
255             if( SP_Session::eExit == session->getStatus() ) {
256                 ret = -1;
257                 if( 0 == session->getRunning() ) {
258                     sp_syslog( LOG_DEBUG, "session(%d.%d) normal exit", sid.mKey, sid.mSeq );
259                     SP_EventHelper::doClose( session );
260                 } else {
261                     sp_syslog( LOG_NOTICE, "session(%d.%d) busy, terminate session later",
262                             sid.mKey, sid.mSeq );
263                     // If this session is running, then onResponse will add write event for this session.
264                     // It will be processed as write fail at the last. So no need to re-add event here.
265                 }
266             }
267         }

在开发机上搭建了一致的环境,tcpdump抓包如下,从中可以清楚的看到链接建立,数据传输和链接断开。

15:13:15.907872 IP 127.0.0.1.37139 > 127.0.0.1.8806: S 1356459970:1356459970(0) win 32792 <mss 16396,sackOK,timestamp 699857189 0,nop,wscale 7>
15:13:25.907863 IP 127.0.0.1.8806 > 127.0.0.1.37139: S 1362613632:1362613632(0) ack 1356459971 win 32768 <mss 16396,sackOK,timestamp 699857189 699857189,nop,wscale 7>
15:13:25.907885 IP 127.0.0.1.37139 > 127.0.0.1.8806: . ack 1 win 257 <nop,nop,timestamp 699857189 699857189>
15:13:15.907874 IP 127.0.0.1.37139 > 127.0.0.1.8806: P 1:670(669) ack 1 win 257 <nop,nop,timestamp 699857189 699857189>
15:13:15.907879 IP 127.0.0.1.8806 > 127.0.0.1.37139: . ack 670 win 267 <nop,nop,timestamp 699857189 699857189>
15:13:15.908683 IP 127.0.0.1.8806 > 127.0.0.1.37139: P 1:171(170) ack 670 win 267 <nop,nop,timestamp 699857189 699857189>
15:13:15.908689 IP 127.0.0.1.37139 > 127.0.0.1.8806: . ack 171 win 265 <nop,nop,timestamp 699857189 699857189>
15:13:15.908828 IP 127.0.0.1.8806 > 127.0.0.1.37139: F 171:171(0) ack 670 win 267 <nop,nop,timestamp 699857190 699857189>
15:13:15.908849 IP 127.0.0.1.37139 > 127.0.0.1.8806: F 670:670(0) ack 172 win 265 <nop,nop,timestamp 699857190 699857190>
15:13:15.908856 IP 127.0.0.1.8806 > 127.0.0.1.37139: . ack 671 win 267 <nop,nop,timestamp 699857190 699857190>

问题是定位到了,奈何功力不够,折腾了几天没能搞定,囧。期间有找过牛人帮忙,结果还是一样。倒不是牛人不够牛,而是太忙了,没时间顾及加上框架自身的复杂性(看了上面那篇博文就知道了),最终影响了问题的解决。

既然不能直接解决,那绕过去吧~我想牛人是这么想的,因为过了两天,牛人发给我一个链接,轻量级框架libevhtp。确实够轻量级,源文件数比spserver少了不少,周末在家翻看了部分源代码,主要是熟悉下里面的函数,以便完成后续的替换。

周一过来写好测试程序,链接出错,呃~

$ g++ -o mytest mytest.cpp  -I/usr/local/include -L/usr/local/lib -levent -levhtp -levent_openssl
/tmp/ccFfrEfs.o: In function `testcb(evhtp_request_s*, void*)':
mytest.cpp:(.text+0x153): undefined reference to `htparser_get_content_length(htparser*)'
mytest.cpp:(.text+0x1b5): undefined reference to `htparser_get_content_length(htparser*)'
mytest.cpp:(.text+0x1ea): undefined reference to `htparser_get_content_length(htparser*)'
collect2: ld returned 1 exit status

怎么回事,undefined reference,这个函数在源文件htparse.h明明就有定义啊?!

106 unsigned int   htparser_get_status(htparser *);
107 uint64_t       htparser_get_content_length(htparser *);
108 uint64_t       htparser_get_content_pending(htparser *);

有问题,搞不定,继续找牛人。牛人过来看了看,说是不是链接的静态库顺序不对,调整几种组合后依旧不行。通过命令ar查看静态库中目标文件,源文件htparse.c也在其中,不懂。

$ ar -t /usr/local/lib/libevhtp.a 
evhtp.c.o
htparse.c.o
evthr.c.o

后来,牛人离开了一会儿,又跑过来说文件htparse.c是c程序,在c++中调用时,需要在头文件中添加额外声明。事后我在网络找到一个类似问题的讨论c++ undefined references with static library。知道了问题所在,修复如下:

@@ -2,6 +2,10 @@
 #define __HTPARSE_H__

 struct htparser;
+
+#ifdef __cplusplus
+extern "C" {
+#endif

 enum htp_type {
     htp_type_request = 0,
@@ -110,5 +114,9 @@
 void           htparser_init(htparser *, htp_type);
 htparser     * htparser_new(void);

+#ifdef __cplusplus
+}
 #endif

+#endif

重新链接通过。用wget命令发送测试数据:

$ wget http://127.0.0.1:8081/statistics/ --header="fields:field1/field2/field3" --post-data="this is a msg for testing" -O "index.html"

server输出如下:

authority is null
request method is 2
uri is /statistics/
content length is 25
content is this is a msg for testing
ext_system values is field1/field2/field3
header details:
User-Agent:Wget/1.12 (linux-gnu)
Accept:*/*
Host:127.0.0.1:8081
Connection:Keep-Alive
Content-Type:application/x-www-form-urlencoded
Content-Length:25
fields:field1/field2/field3

最后说下几个中间碰到的几个问题吧

  • htparse.h中定义的函数void * htparser_get_userdata(htparser *),被误用来获取客户端发送的数据。其实客户端发送的数据是在结构体evhtp_request_sbuffer_in域中,具体见源文件evhtp.c。在业务代码中,调用evbuffer_copyout函数就能获得客户端发送的数据了。
  • 在上面的测试程序中,返回给客户端的消息,是通过下面的代码片段发送的。
    evbuffer_add_reference(request->buffer_out, "foobar", 6, NULL, NULL);
    evhtp_send_reply(request, EVHTP_RES_OK);
    

    在业务代码中,先是创建了一个char数组用作缓冲区,将要返回的消息格式化到缓冲区中,然后调用类似上面片段中的代码。在测试过程中,发现返回的消息字节数是正确的,但是内容是不完整的。好吧,我又去问了牛人。牛人看了看这函数名,说道这是一个引用,想必在写事件触发的时候,缓冲区已经释放了,导致返回消息出错,改成调用函数evbuffer_add,问题解决。


测试程序:

#include <stdio.h>
#include <stdlib.h>
#include <string.h>
#include <stdint.h>
#include <errno.h>
#include <iostream>

#include <evhtp.h>

using namespace std;

int dump_header(evhtp_kv_t * kv, void * arg)
{
    char * buf = (char *)arg;
    int len = strlen(buf);
    len += snprintf(buf + len, 1024-len, "%s:%s\n", kv->key, kv->val);
    buf[len] = '';
    return 0;
}

void testcb(evhtp_request_t * request, void * a) {
    if (NULL == request->uri->authority) 
        cout << "authority is null" << endl;

    cout << "request method is " << evhtp_request_get_method(request) << endl;
    cout << "uri is " << request->uri->path->full << endl;
    cout << "content length is " << evhtp_request_content_len(request) << endl;
    char buf[1024] = {0};
    evbuffer_copyout(request->buffer_in, buf, evhtp_request_content_len(request));
    buf[evhtp_request_content_len(request)] = '';
    cout << "content is " << buf << endl;

    cout << "ext_system values is " << evhtp_kv_find(request->headers_in, "fields") << endl; 
    char mybuf[1024];
    mybuf[0] = '';
    evhtp_kvs_for_each(request->headers_in, dump_header, (void *)mybuf);
    cout << "header details:\n" << mybuf << endl;

    evbuffer_add_reference(request->buffer_out, "foobar", 6, NULL, NULL);
    evhtp_send_reply(request, EVHTP_RES_OK);

}

int main(int argc, const char* argv[]) {
    evbase_t *evbase = event_base_new();
    evhtp_t  *htp    = evhtp_new(evbase, NULL);

    evhtp_set_cb(htp, "/statistics/", testcb, NULL);
    evhtp_set_glob_cb(htp, "/statistics/*", testcb, NULL);
    evhtp_use_threads(htp, NULL, 4, NULL);

    evhtp_bind_socket(htp, "0.0.0.0", 8081, 1024);

    event_base_loop(evbase, 0);
    return 0;
}

2014-01-19@桃苑公寓

20131214

原文见6. Models, Templates and Views


6. 模型,模板和视图

目前我们已经建好了模型并填充了数据,现在可以将组装零件了。我们会了解如何将数据放到视图中,以及如何在模板中展示数据。

6.1. 基本流程:数据驱动页面

在Django中创建数据驱动的页面主要有5个步骤。

  1. 首先,在应用的views.py文件中导入使用的模型
  2. 在使用的视图中,查询模型来获得需要展示的数据
  3. 将模型的结果传递到模板的上下文中
  4. 建立模板以想要的方式展示数据
  5. 如果你目前还没有做这些,映射一个URL到视图中

这几个步骤概括了Django的框架是如何分离模型,视图和模板的。

6.2. 在Rango主页展示分类

主页的需求之一就是展示访问最多的5个分类。

6.2.1. 导入需要的模型

这个需求需要通过上面5个步骤来完成。首先,打开rango/views.py,从Rango的models.py文件导入模型Category

# Import the Category model
from rango.models import Category

6.2.2. 修改Index视图

在开始之前,我们需要修改我们的index()函数。回想一下,index()函数应该是负责主页视图。修改函数如下。

def index(request):
    # Obtain the context from the HTTP request.
    context = RequestContext(request)

    # Query the database for a list of ALL categories currently stored.
    # Order the categories by no. likes in descending order.
    # Retrieve the top 5 only - or all if less than 5.
    # Place the list in our context_dict dictionary which will be passed to the template engine.
    category_list = Category.objects.order_by('-likes')[:5]
    context_dict = {'categories': category_list}

    # Render the response and send it back!
    return render_to_response('rango/index.html', context_dict, context)

这里在一次执行了步骤2和步骤3。首先,我们查询Category来获得访问最多的5个分类。这里我们使用方法order_by()以降序排列分类的受欢迎程度——即符号-表示降序。然后限制列表中开始的5个Category对象。

查询结束后,我们将列表的索引(存在变量category_list中)传递给一个字典,context_dict。这个字典在render_to_response()调用中作为上下文的一部分传递给模板引擎。

6.2.3. 修改主页模板

更新了视图后,我们还要做的就是修改位于工程template目录的模板文件rango/index.html。修改HTML代码如下。

<!DOCTYPE html>
<html>
    <head>
        <title>Rango</title>
    </head>

    <body>
        <h1>Rango says...hello world!</h1>

        {% if categories %}
            <ul>
                {% for category in categories %}
                <li>{{ category.name }}</li>
                {% endfor %}
            </ul>
        {% else %}
            <strong>There are no categories present.</strong>
        {% endif %}

        <a href="/rango/about/">About</a>
    </body>
</html>

这里,我们使用Django的模板语言iffor控制语句来展示数据。在页面的<body>中,测试categories——含有我们列表的上下文变量——实际上包含任何分类(例如{% if categories %})。

如果有,我们进而构建出一个无需的HTML列表(在标签<ul>中)。循环{% for category in categories %}遍历结果列表,在一对<li>标签中作为列表元素输出每个分类的名字({{ category.name }})。

如果没有分类存在,会输出一条消息。

就像在Django模板语言中看到的,所有的命令都是通过{%%}括起来,而变量是通过{{}}括起来。

如果你现在通过地址http://127.0.0.1:8000/rango ,你就会在标题的下面看到三个分类,如图[1]

rango-categories-simple

6.3. 创建一个Details页面

根据Rango需求,还需要展示一个与分类相关的页面列表。这里有些挑战。需要新建一个新的可参数化的视图。还需要新建URL规则和URL字符串来表示分类名。

6.3.1. URL设计和映射

我们首先考虑URL的问题。一种方式就是在URL中给每个分类一个唯一的ID。例如,我们可以这样创建分类/rango/category/1/或者/rango/category/2,这里数值分别对应ID为1和2的分类。然而,这样的分类规则不易被人们理解。虽然我们可以推断出数值是对应分类的,但是用户怎么会知道那个分类对应ID1或者2?如此一来,用户只能去尝试。

不过,我们可以将分类名作为URL的一部分。/rango/category/Python/应该会给我们一个关于Python分类的页面列表。这是一个简单的,可读的并且有意义的URL。如果我们采用这种方法,那就必须处理分类名由多个单词组成的情形,例如“Other Frameworks”,等。

注意:

设计简洁的URL是web设计中一个非常重要的方面。细节见Wikipedia’s article on Clean URLs

6.3.2. 分类页面流程

选好了URLs设计规范,可以开始后续工作了。我们要采取下面的步骤。

  1. 导入页面模型到rango/views.py
  2. rango/views.py中创建一个新视图——名为category——这个视图会接收一个用来存放编码后的分类名的参数category_name_url
  3. 创建一个模板,templates/rango/category.html
  4. 更新Rango的urlpatterns,将category视图映射到rango/urls.py的URL模式

我们还要更新index()视图和index.html模板来提供到分类视图的链接。

6.3.3. 分类视图

rango/views.py中,我们首先需要导入Page模型。这意味着,我们必须在文件的开头加入下面的导入语句。

from rango.models import Page

接下来,添加新视图,category()

def category(request, category_name_url):
    # Request our context from the request passed to us.
    context = RequestContext(request)

    # Change underscores in the category name to spaces.
    # URLs don't handle spaces well, so we encode them as underscores.
    # We can then simply replace the underscores with spaces again to get the name.
    category_name = category_name_url.replace('_', ' ')

    # Create a context dictionary which we can pass to the template rendering engine.
    # We start by containing the name of the category passed by the user.
    context_dict = {'category_name': category_name}

    try:
        # Can we find a category with the given name?
        # If we can't, the .get() method raises a DoesNotExist exception.
        # So the .get() method returns one model instance or raises an exception.
        category = Category.objects.get(name=category_name)

        # Retrieve all of the associated pages.
        # Note that filter returns >= 1 model instance.
        pages = Page.objects.filter(category=category)

        # Adds our results list to the template context under name pages.
        context_dict['pages'] = pages
        # We also add the category object from the database to the context dictionary.
        # We'll use this in the template to verify that the category exists.
        context_dict['category'] = category
    except Category.DoesNotExist:
        # We get here if we didn't find the specified category.
        # Don't do anything - the template displays the "no category" message for us.
        pass

    # Go render the response and return it to the client.
    return render_to_response('rango/category.html', context_dict, context)

新视图的步骤跟index()视图一致。我们首先从request中获得context,然后构建一个上下文字典,渲染模板,发送结果。在这里,区别就是上下文字典的构造有点复杂。要构造上下文字典,我们需要根据传递给视图函数category()的参数category_name_url来确定哪个分类可见。一旦确定了分类,从数据库中取得相关信息,并将结果添加到上下文字典context_dict中。后面会给出如何从URL中获得category_name_url的值。

在视图函数category()中,我们假设分类名category_name_url中的空格被转成了下划线。所以我们把所有的下划线替换成了空格。不幸的是,这是一种相当原始的处理URL中分类名编解码的方式。作为后续的联系,你需要完成两个函数来完成分类名的编解码。

6.3.4. 分类模板

现在给新视图创建模板。在目录<workspace>/tango_with_django_project/templates/rango/中,创建category.html。在新建的文件中,添加下面的代码。

<!DOCTYPE html>
<html>
    <head>
        <title>Rango</title>
    </head>

    <body>
        <h1>{{ category_name }}</h1>
        {% if category %}
            {% if pages %}
            <ul>
                {% for page in pages %}
                <li><a href="{{ page.url }}">{{ page.title }}</a></li>
                {% endfor %}
            </ul>
            {% else %}
                <strong>No pages currently in category.</strong>
            {% endif %}
        {% else %}
            The specified category {{ category_name }} does not exist!
        {% endif %}
    </body>
</html>

上面的HTML实例代码中,再次说明了我们是如何获得通过上下文传递给模板的数据的。我们使用了变量category_namecategorypages对象。如果category在模板上下文中没有定义,即数据库中没有这个分类,会出现一条友好的提示说明这种情况。如果情况相反,我们继续处理pages。如果pages没有定义或者没有任何元素,我们会给出一条消息说明没有页面。否则,会在HTML的列表中展示某个分类的页面。对于列表中的每个页面,会给出titleurl属性。

6.3.5. 参数化URL的映射

现在,看下我们是怎么把category_name_url传递给函数category()的。要完成这个,我们需要修改Rango的urls.py,更新urlpatterns元组如下。

urlpatterns = patterns('',
    url(r'^$', views.index, name='index'),
    url(r'^about/$', views.about, name='about'),
    url(r'^category/(?P<category_name_url>\w+)/$', views.category, name='category'),) #New!

正如你看到的,我们添加了一个相当复杂的元素,它会在正则表达式r'^(?P<category_name_url>\w+)/$'匹配的时候调用函数view.category()。我们的正则表达式会在删除URL的斜杠之前去匹配任意的字符序列(例如 a-z,A-Z,_,或者0-9)。匹配的值会作为强制参数request后面的唯一参数category_name_url传递给views.category()。本质上说,硬编码到正则表达式中的变量名就是Django在你的视图函数定义中寻找的参数名。

6.3.6. 修改Index视图和模板

我们写好了新的视图,一切就绪——不过,还需要完成一件事。主页视图需要更新以便用户可以看到列出的分类页面。更新rango/views.py视图的index()的如下。

def index(request):
    # Obtain the context from the HTTP request.
    context = RequestContext(request)

    # Query for categories - add the list to our context dictionary.
    category_list = Category.objects.order_by('-likes')[:5]
    context_dict = {'categories': category_list}

    # The following two lines are new.
    # We loop through each category returned, and create a URL attribute.
    # This attribute stores an encoded URL (e.g. spaces replaced with underscores).
    for category in category_list:
        category.url = category.name.replace(' ', '_')

    # Render the response and return to the client.
    return render_to_response('rango/index.html', context_dict, context)

正如行间的注释所指出的,取出数据库返回的每个分类,遍历分类表对每个分类进行友好的URL编码。这种友好的URL会作为属性保存到Category对象的内部(例如,我们利用python的动态类型随时添加这个属性)。

然后将分类列表category_list传递到模板的上下文,这样就可以渲染了。当每个分类的url属性变得可用,可以更新模板index.html如下。

<!DOCTYPE html>
<html>
    <head>
        <title>Rango</title>
    </head>

    <body>
        <h1>Rango says..hello world!</h1>

        {% if categories %}
            <ul>
                {% for category in categories %}
                <!-- Following line changed to add an HTML hyperlink -->
                <li><a href="/rango/category/{{ category.url }}">{{ category.name }}</a></li>
                {% endfor %}
            </ul>
       {% else %}
            <strong>There are no categories present.</strong>
       {% endif %}

    </body>

这里我们更新了每个列表元素(<li>),在其中添加了一个HTML超链接(<a>)。这个超链接有一个href属性,我们使用这个属性来指定由{{ category.url }}定义的目标URL。

6.3.7. DEMO

现在访问Rango的主页。你就会看到主页列出了所有的分类。分类应该是可以点击的链接。在Python上点击会带你到Python细节分类的视图,如图2所示。如果你看到类似Official Python Tutorial的链接列表,那么你已经成功的建立了新视图。试着访问并不存在的分类,例如/rango/category/computers。你应该会看到该分类没有页面的提示消息。

rango-links


20131214@南山 桃苑公寓

20131213

今天折腾Django和Chartit碰到这么几个问题,记下来方便以后查阅。

  • 没有主键

当时场景是,表已经存在,于是参照集成已有的数据库和应用,在命令行执行

python manage.py inspectdb > dbmodels

自动生成的model代码如下

class AppstoreKpiDailySmsTbl(models.Model):
    statdate = models.DateField(blank=True, null=True)
    #省略...
    class Meta:
        managed = False
        db_table = 'appstore_kpi_daily_sms_tbl'

在管理页面访问时,有下面的错误

ORA-00904: "APPSTORE_KPI_DAILY_SMS_TBL"."ID": invalid identifier

大意是说没有主键id。重命名原表,用syncdb重新建表,再把数据导进去。

  • 日期格式

通过后台添加数据报错

ORA-01843: not a valid month

对于这个问题的讨论见这里Django – Oracle backend error。将statdate的类型改成DateTimeField后解决,DateTimeField在oracle中会表示成TIMESTAMP

  • 前端展示,使用的是Django-Chartit,使用的版本不支持将datetime类型的变量作为X坐标,报错
datetime.date(2012, 5, 22) is not JSON serializable

对于该问题的讨论见Support for datetime objects in xAxis。解决方式是使用这里的补丁support for lambda functions (datefield added)。相应的文件chartdata.pyvalidation.py位于目录C:\Python27\Lib\site-packages\chartit。打好补丁,照这个例子django-chartit example调整下代码,就可以了。

result


20131213@科技园 迈科龙

20131208

原文 Golang channels tutorial

作者 GUZ ALEXANDER


Golang channels

Golag内建有对并发程序的支持。在函数调用的前面放置一个go语句,就会在调用代码地址空间的独立并发线程中执行函数。这种线程在go语言中称为goroutine。这里要注意的是并发并非总是表示并行。goroutines是创建并发程序的一种方式,这些程序在硬件允许的条件下可以并行的执行。并发与并行的话题有一个详细的介绍Concurrency is not parallelism

首先,看一个goroutine的例子:

func main() {
     // Start a goroutine and execute println concurrently
     go println("goroutine message")
     println("main function message")
}

这个程序会打印出main function message,可能会打印出goroutine message可能是因为goroutine的产生有其特点。当启动goroutine的时候,调用代码(这里是main函数)不会等待goroutine结束,而是继续执行。main函数在调用println之后执行结束,在go语言中这意味着整个程序以及所有产生的goroutines停止执行。不过在程序退出之前,有可能goroutine有可能执行了代码,打印出goroutine message字符串。

如你所想一定有某种方法可以避免这种情况。Golang里面的channels应运而生。

Channels基础

Channels是用来同步并发执行的函数,以及提供了一个通过传递某个特定类型的值在函数间完成通信的机制。Channels有这么几个特性:可以通过channel发送的元素类型,容量(缓冲大小)和通过操作符<-指定的通信方向。可以通过内建的函数make分配信道:

i := make(chan int)       // by default the capacity is 0
s := make(chan string, 3) // non-zero capacity

r := make(<-chan bool)          // can only read from
w := make(chan<- []os.FileInfo) // can only write to

Channels是一等公民,可以像其他的值到处适用:例如struct元素,函数参数,函数返回值,甚至作为另一个channel的类型:

// a channel which:
//  - you can only write to
//  - holds another channel as its value
c := make(chan<- chan bool)

// function accepts a channel as a parameter
func readFromChannel(input <-chan string) {}

// function returns a channel
func getChannel() chan bool {
     b := make(chan bool)
     return b
}

channel的读写是通过操作符<-完成的。它相对于channel变量的位置决定了是读操作还是写操作。下面的例子说明了如何使用,不过由于后面要提到的原因,这段代码是有问题的。

func main() { c := make(chan int) c <- 42 // write to a channel val := <-c // read from a channel println(val) }

现在,我们知道了channel是什么,如何创建他们以及基本的操作,回到第一个例子,看看channel是如何发挥作用的。

func main() {
     // Create a channel to synchronize goroutines
     done := make(chan bool)

     // Execute println in goroutine
     go func() {
          println("goroutine message")

          // Tell the main function everything is done.
          // This channel is visible inside this goroutine because
          // it is executed in the same address space.
          done <- true
     }()

     println("main function message")
     <-done // Wait for the goroutine to finish
}

这个程序会毫无疑问的输出所有消息。为什么?channeldone没有任何缓冲(因为没有指定它的容量)。在非缓冲信道上的操作会阻塞代码的执行,直到发送者和接收者可以通信。这就是为什么非缓冲的信道也称为同步的信道。在我们的例子中,main函数中的读操作<-done会阻塞直到goroutine向信道中写入数据。因此,程序只会在读操作完成后退出。

在带有缓冲的信道中,如果buffer非空,所有的读操作都是成功的,不会阻塞,写操作同理——如果buffer非满。这样的channel称为异步信道。下面的例子说明了他们之间的区别:

func main() {
     message := make(chan string) // no buffer
     count := 3

     go func() {
          for i := 1; i <= count; i++ {
               fmt.Println("send message")
               message <- fmt.Sprintf("message %d", i)
          }
     }()

     time.Sleep(time.Second * 3)

     for i := 1; i <= count; i++ {
          fmt.Println(<-message)
     }
}

在这个例子中,message是一个异步的channel,程序的输出如下:

send message
// wait for 3 seconds
message 1
send message
send message
message 2
message 3

你会看到,在goroutine中第一次写入后,所有的写操作都阻塞了,直到第一次读操作完成(大概3s后)。

现在,给信道message增加一个buffer,例如,创建的代码看起来是这个样子的message := make(chan string, 2)。这次,输出如下:

send message
send message
send message
// wait for 3 seconds
message 1
message 2
message 3

这里,我们可以看到所有的写操作都完成了,而没有等待读操作,因为信道的buffer能够缓冲三条消息。通过修改信道的容量,可以控制正在处理的消息数,从而限制系统的吞吐量。

死锁

现在,回头看下那段读写操作有问题的代码。

func main() {
     c := make(chan int)
     c <- 42    // write to a channel
     val := <-c // read from a channel
     println(val)
}

运行的时候你会得到这样的出错提示(细节会有所不同):

fatal error: all goroutines are asleep - deadlock!

goroutine 1 [chan send]:
main.main()
     /fullpathtofile/channelsio.go:5 +0x54
exit status 2

你得到的错误称为deadlock。这种场景是这样的,两个goroutines互相等待,没有人能够继续执行下去。Golang会在运行时检测到死锁,这就是为什么我们能看到这个错误提示。这种错误的发生是通信的阻塞本质所致。

这里的代码是运行在单一的线程中,一行接着一行,连续执行。对信道的写操作(c <- 42)阻塞了整个程序的执行,因为,我们知道对同步信道的写操作只有在接收者准备接收数据时才会成功。不过我们是在下一行代码中创建接收者的。

这段代码要变得可执行,可以这样写:

func main() {
     c := make(chan int)

     // Make the writing operation be performed in
     // another goroutine.
     go func() { 
        c <- 42 
     }()
     val := <-c
     println(val)
}

range channels 和 closing

在前面的一个例子中,我们往信道中发送了好几条消息,然后读取。读取部分的代码是这样的:

for i := 1; i <= count; i++ {
     fmt.Println(<-message)
}

为了执行读取操作同时不会死锁,必须知道发送的消息数(准确的说是count),因为读取的数目不能超过发送的数目。不过这不是很方便。如果能够给出通用的代码就好了。

在go语言中,有一个称为range expression的东东可以用来迭代arrays,slices,maps和channels。对于channels,迭代会一直运行直到channel关闭。考虑下面的例子(目前还不能运行):

func main() {
     message := make(chan string)
     count := 3

     go func() {
          for i := 1; i <= count; i++ {
               message <- fmt.Sprintf("message %d", i)
          }
     }()

     for msg := range message {
          fmt.Println(msg)
     }
}

不幸的是,目前这段代码还不能工作。正如前面提到的,range会一直执行直到channel显式关闭。我们所要作的就是通过函数close关闭channel。goroutine看起来是这个样子的:

go func() {
     for i := 1; i <= count; i++ {
          message <- fmt.Sprintf("message %d", i)
     }
     close(message)
}()

关闭一个channel好处很多——在关闭的channel上的读操作是不会阻塞的,总是返回channel类型的默认值:

done := make(chan bool)
close(done)

// Will not block and will print false twice 
// because it’s the default value for bool type
println(<-done)
println(<-done)

这个特性可以用作goroutines之间的同步。我们回到使用同步的一个例子(就是使用donechannel的那个例子):

func main() {
     done := make(chan bool)

     go func() {
          println("goroutine message")

          // We are only interested in the fact of sending itself, 
          // but not in data being sent.
          done <- true
     }()

     println("main function message")
     <-done 
}

这里channeldone仅仅用来同步代码的执行,而非发送数据。对于这种情形,可以这样做:

func main() {
     // Data is irrelevant
     done := make(chan struct{})

     go func() {
          println("goroutine message")

          // Just send a signal "I'm done"
          close(done)
     }()

     println("main function message")
     <-done
}

因为我们在goroutine中关闭了信道,读操作不会阻塞,main函数得以继续执行。

Mutiple channels and select

在实际程序中,可能需要不止一个goroutine和channel。更加独立的部分是——需要高效的同步。看一个更加复杂的例子:

func getMessagesChannel(msg string, delay time.Duration) <-chan string {
     c := make(chan string)
     go func() {
          for i := 1; i <= 3; i++ {
               c <- fmt.Sprintf("%s %d", msg, i)
               // Wait before sending next message
               time.Sleep(time.Millisecond * delay)
          }
     }()
     return c
}

func main() {
     c1 := getMessagesChannel("first", 300)
     c2 := getMessagesChannel("second", 150)
     c3 := getMessagesChannel("third", 10)

     for i := 1; i <= 3; i++ {
          println(<-c1)
          println(<-c2)
          println(<-c3)
     }
}

这里我们有一个创建信道的函数,它会产生一个goroutine,以指定的时间间隔向信道中填充3个消息。我们看到信道c3的时间间隔最小,因为我们认为它的消息会在其他消息之前出现。但是输出是这样的:

first 1
second 1
third 1
first 2
second 2
third 2
first 3
second 3
third 3

很明显,我们得到了一个连续的输出。这是由于第一个channel的读操作在每次读操作中阻塞了大概300ms,其他的操作必须等待。我们实际想要的则是只要信道中有消息就要去读。

在go语言中,对于多个信道之间的通信有一个select语句。它跟通常的switch非常接近,不过这里的场景是通信操作(有读和写)。如果case中的条件成立,那么相应的代码块就会执行。所以,要完成我们想要的,可以这么写:

for i := 1; i <= 9; i++ {
     select {
     case msg := <-c1:
          println(msg)
     case msg := <-c2:
          println(msg)
     case msg := <-c3:
          println(msg)
     }
}

注意到数字9:对于每个信道有3次写操作,这就是为什么必须执行9次select语句。在守护程序中,一个常见的做法是在无限循环中运行select,不过在这里我们会得到死锁。

现在,我们得到了期待的输出,没有一个读操作会阻塞其他。输出如下:

first 1
second 1
third 1 // this channel does not wait for others
third 2
third 3
second 2
first 2
second 3
first 3

Conclusion

Channels是go语言中一个非常有用,同时十分有意思的机制。不过要想有效的使用它,需要弄明白它是如何工作。在本文中,作者解释了必要的基础知识。进一步的学习,可以参见下面的资料:

20131208@南山 桃苑公寓

同步事故

缘起昨天统计数据不正常,检查某个目录的时候发现这个目录下的所有以日期命名的子文件夹都变成了以日期作为文件名的文件。这种情况之前也发生过,同步脚本里面执行rsync的命令是这样的rsync -zrtopg $f ${arr_dir_dst[$idx]}/${TODAY},当指定的文件不存在时,同步过去的文件就变成了以日期命名的文件。问了下同事,原来他是每天00:30分开始处理同步过去的文件,之后就将文件夹删除了。所以就出现了上面的现象。

至于为什么之后还有文件同步过来呢——那是因为同步脚本在每个小时的27和54分,由crontab定时执行。在执行的过程中,会检测文件的最后修改时间,只有这个时间超过设定值时,才会开始同步。这带来的问题就是,如果一个文件一直写直到零点,那么它就不会被同步。所以又一个脚本在每天03:17分去昨天的目录中执行一次同步,那些文件名为日期的文件就是这会同步过去的。

知道了原因,就好调整脚本了。在脚本的最后加上了这段代码,就是在00:27分同步的时候,去昨天的文件夹执行一次同步。

00:27分的时候,观察同步日志发现

 9391 Wed Nov 27 00:27:01 CST 2013
 9392 ==================================
 9393 /usr/local/nearme/statistics/stat_rom_svr/scripts/mv_and_bak_rom.sh: line 85: cd: /usr/local/nearme/statistics/stat_rom_svr/log/install/2013-11-26: No such file or directory
 9394 succ to rsync file launch_4390
 9395 succ to rsync file launch_4391
 9396 /usr/local/nearme/statistics/stat_rom_svr/scripts/mv_and_bak_rom.sh: line 85: cd: /usr/local/nearme/statistics/stat_rom_svr/log/launch/2013-11-26: No such file or directory

目录不存在,检查后发现目录名不对,应该是20131126,中间不带-。当时也没多想中间的两行,即

 9394 succ to rsync file launch_4390
 9395 succ to rsync file launch_4391

修改了脚本,手动同步了日志。改完没多久,收到一条短信,报告收集服务挂掉重启了。心想,ca,难道最近流行挂,因为之前另一个服务每天崩溃一次,搞得我很崩溃。这个程序,除了刚上线那两天由于协程阻塞导致资源得不到释放,内存暴涨,不过增加了超时设置后,一直运行良好。咋就挂了呢?都凌晨了,也重启了,洗洗睡了。

今天过来,检查备份目录,发现一个奇怪的问题——两个launch的日志出现在install日志的备份目录中

 [uc@hz0073 2013-11-27]$ pwd
 /mnt/mfs/stat_rom_svr/install_bak/2013-11-27
 [uc@hz0073 2013-11-27]$ ll -th
 总用量 327M
 -rw-r--r-- 1 root root 129M 11月 27 15:09 install_28
 -rw-r--r-- 1 root root  66M 11月 27 00:27 launch_4391
 -rw-r--r-- 1 root root 133M 11月 27 00:17 launch_4390

第一反应是去转移脚本中检查是不是目录配反了,一切正常。奇怪!

继续检查转移脚本日志,那两行成功同步的脚本引起了我的注意,穿越的那两个日志不正是在这里完成同步的嘛!咋回事?????????

陷入沉思中….

突然想起,会不会脚本中某行执行出错,没有退出,后续的代码依旧执行下去(请尽情笑话我的智商)。顺着这个往下想,真相渐渐浮现了~

 if [ "$HOUR" -eq 0 -a "$MIN" -le 30 ]; then
     for idx in ${arr_idx[@]}
     do
          #这里执行出错
         cd ${arr_dir_src_yesterday[$idx]}
         for f in `ls`
         do
             rsync -zrtopg $f ${arr_dir_dst[$idx]}/${YESTERDAY}
             res=$?
             if [ $res -eq 0 ]; then
                 echo succ to rsync file $f
                 mv $f ${arr_dir_bak[$idx]}
             else
                 echo fail to rsync file $f
             fi
         done
     done
 fi

切换目录出错,当前目录还是上次那个目录, 即launch日志的目录launch/20131126

正常情况下,这段脚本应该是在昨天的目录20131126中执行,所以在转移日志的时候没有对最后的修改时间做判断,直接move走。问题是当前目录由于切换失败,目录变成了20131127,且文件launch_4391正在写入。这就是为什么文件launch_4391大小没有超过128M,却完成了同步。至于为什么出现在安装目录,是因为备份目录的定义如下,所以先备份到了install_bak目录中,for循环第二次执行,由于没有文件可以同步(因为第一次的时候都mv走了),所以只是报了目录不存在的错误:

 declare -a arr_dir_bak=(\
 $PATH_BAK/install_bak/$MYDAY \
 $PATH_BAK/launch_bak/$MYDAY \
 )

大致的流程就是

  1. cd切换目录失败
  2. 同步文件 launch_4390 和 launch_4391 到 install_bak 目录
  3. 再次切换目录失败
  4. 没有文件同步,脚本执行结束,退出

至于为什么在00:30收到短信,因为转移脚本是在00:27执行。当他执行的时候收集程序正在写文件,导致程序挂掉,这也就解释了为什么launch_4391的最后一行是不完整的。进程监控脚本每隔3分钟执行一次,当00:30执行的时候,发现进程不在了,发送短信报警。


总结

  1. 日期格式混乱,201311272013-11-27
  2. 学业不精,作为一个半路出家的码侬还有很多的坑要跳
  3. 天敏同学的增量读取工具快来拯救我吧,谄笑中

附 罪犯真相,任由扔砖:

#!/bin/bash

#sleep 5m
echo ==================================
echo `date`
echo ==================================

#get current time
TODAY=`date +"%Y%m%d"`
MYDAY=`date +"%Y-%m-%d"`
YESTERDAY=`date +"%Y%m%d" -d" 1 days ago"`
HOUR=`date +"%H"`
MIN=`date +"%M"`

#copy file to dst_dir whose modified time ealier then curr time by 10 min
DIFF_TIME=600

#max lines of single file 50000
MAXLINES=50000

#max size of single file 128M
MAXSIZE=134217728

#source path
### for online 73 ###
PATH_SRC=/usr/local/nearme/statistics/stat_rom_svr/log

#PATH_SRC=/mnt/mfs/stat_sdk_server
PATH_BAK=/mnt/mfs/stat_rom_svr

#destination path
PATH_DST=/var/data/statistics

#source directory array
declare -a arr_dir_src=(\
$PATH_SRC/install/$TODAY \
$PATH_SRC/launch/$TODAY \
)

declare -a arr_dir_src_yesterday=(\
$PATH_SRC/install/$YESTERDAY \
$PATH_SRC/launch/$YESTERDAY \
)
#destination directory array
declare -a arr_dir_dst=(\
root@192.168.10.11::hz0073_rom_install \
root@192.168.10.11::hz0073_rom_launch \
)

#backup directory array
declare -a arr_dir_bak=(\
$PATH_BAK/install_bak/$MYDAY \
$PATH_BAK/launch_bak/$MYDAY \
)

arr_idx=(0 1)

for idx in ${arr_idx[@]}
do
    curr_time=`date +%s`
    cd ${arr_dir_src[$idx]}
    for f in `ls`
    do
        file_time=`stat -c "%Y" $f`
        file_size=`stat -c "%s" $f`
        diff_time=$(($curr_time-$file_time))
    if  [ "$diff_time" -gt "$DIFF_TIME" -a "$file_size" -gt "$MAXSIZE" ]; then

            rsync -zrtopg $f ${arr_dir_dst[$idx]}/${TODAY}
            res=$?
            if [ $res -eq 0 ]; then
                echo succ to rsync file $f
                mv $f ${arr_dir_bak[$idx]}
            else
                echo fail to rsync file $f
            fi             
    fi
    done
done

if [ "$HOUR" -eq 0 -a "$MIN" -le 30 ]; then
    for idx in ${arr_idx[@]}
    do
        cd ${arr_dir_src_yesterday[$idx]}
        for f in `ls`
        do
            rsync -zrtopg $f ${arr_dir_dst[$idx]}/${YESTERDAY}
            res=$?
            if [ $res -eq 0 ]; then
                echo succ to rsync file $f
                mv $f ${arr_dir_bak[$idx]}
            else
                echo fail to rsync file $f
            fi
        done
    done
fi

20131127@南山 桃苑公寓

20131123

没啥好说的,就这么着吧~上周小车失窃,着实让我郁闷了两天;可哥结婚今天请吃饭,没去,短信说明年回去看他,没回,估计是被维曦他们一帮人灌倒了


原文见 5. Models and Databases

5. 模型与数据库

与数据库打交道通常是一件棘手的事情。在Django中,通过object relational mapping(ORM)这一功能很好地克服了上述问题,同时Django通过模型封装了数据表。从本质上说,模型就是python的对象,它描述了你的数据模型/表。所有你需要做的就是操作相应的Django对象,而非通过SQL直接访问数据库。在本章中,我们会介绍如何安装数据库以及Rango需要的模型。

5.1. Rango’s Requirements

首先,我们先过下Rango的数据需求。下面的列表给出了Rango数据需求的关键细节。

  1. Rango本质上是一个网页目录——一个包含到其他站点链接的网站
  2. 有很多不同的网页分类,每个分类包含一定数目的链接。我们在第一章中假设有一个一对多的关系。见如下关系表。
  3. 分类有名字,访问数以及喜欢数。
  4. 页面属于某个分类,有标题,URL以及访问数。

5.2. 告诉Django你的数据库

在我们创建任何模型之前,首先要建立数据库的配置。要完成这个,打开文件settings.py,定位到字典DATABASES。现在,修改default键值对如下。

DATABASES = {
    'default': {
        'ENGINE': 'django.db.backends.sqlite3',
        'NAME': DATABASE_PATH,
    }
}

也要创建变量DATABASE_PATH,并把它添加到settings.py的顶部,与之前定义的路径放到一起。

DATABASE_PATH = os.path.join(PROJECT_PATH, 'rango.db')

这里,我们定义默认的数据库使用SQLite Django backend。这使得我们能够访问轻量级的python数据库。SQLite,非常适合用于开发。其他需要设置的值是NAME键值对,我们将其设置成DATABASE_PATH。对于SQLite数据库,余下的USERPASSWORDHOSTPORT是不需要的,因此可以放心的移除。

5.3. 创建模型

settings.py中配置好数据库之后,现在我们可以来创建用于Rango应用的原始数据模型了。

rango/models.py中,定义两个类——两者都需要继承django.db.models.Model。这两个python类定义了表示分类页面的两个模型。定义CategoryPage模型如下。

class Category(models.Model):
    name = models.CharField(max_length=128, unique=True)

    def __unicode__(self):
        return self.name

class Page(models.Model):
    category = models.ForeignKey(Category)
    title = models.CharField(max_length=128)
    url = models.URLField()
    views = models.IntegerField(default=0)

    def __unicode__(self):
        return self.title

在定义模型的时候,需要指定属性列表以及可选参数相关的类型。Django提供了大量内置的类型。常用的类型如下。

  • CharField,存储字符数据的字段(例如,字符串)。指定max_length来表示可存储的最大字符数。
  • URLField,跟CharField很像,不过用于存储资源URL。你也可以指定一个max_length参数。
  • IntegerField,存储整数。
  • DateField,存储python的datetime.date

完整的列表见Django documentation on model fields

对于每一个字段可以指定unique属性。如果设置为True,在整个数据库模型中,给字段只允许存在唯一的实例。例如,对于我们上面定义的Category模型。字段name设置为unique——因为每个分类的名字必须是唯一的。

这用于在你想将某个字段作为额外的数据库键时。你还可以对每个字段指定其他的属性,例如指定一个默认值(default='value'),以及某个字段是否可以为NULLnull=True)。

Django还提供了一个简单的机制允许我们关联模型/数据库表。这个机制通过三种字段类型来实现,具体如下。

  • ForeignKey,该字段用来表示一对多的关系。
  • OneToOneField,该字段定义严格的一对一关系。
  • ManyToManyField,该字段表示多对多关系。在上面的示例模型中,Page模型中字段category就是ForeignKey类型。这使得我们能够建立与模型/表Category一对多的关系,将其作为字段构造函数的一个参数。你应该注意到Django在每个模型对应的表中自动创建了一个ID字段,所以你没有必要显式的为每个模型定义一个主键,Django使得你的生活轻松多了!

5.4. 创建并同步数据库

定义好了模型,就可以让Django施法了,在数据库中创建表。我们需要使用脚本manage.py,想下面这样调用:

$python manage.py syncdb

接下来你可以跟着屏幕上的提示做。你可以看到Django在你的数据库中创建了很多表。引入注意的是这两张表rango_categoryrango_page。它们分别对应两个Django模型CategoryPage。示例脚本产生的输出如下。

$ python manage.py syncdb

Creating tables ...
Creating table auth_permission
Creating table auth_group_permissions
Creating table auth_group
Creating table auth_user_groups
Creating table auth_user_user_permissions
Creating table auth_user
Creating table django_content_type
Creating table django_session
Creating table django_site
Creating table rango_category <-- Rango Category model
Creating table rango_page     <-- Rango Page model

You just installed Django's auth system, which means you don't have any superusers defined.
Would you like to create one now? (yes/no): yes
Username (leave blank to use '<YOUR USERNAME>'): <ENTER A USERNAME>
Email address: <ENTER YOUR E-MAIL ADDRESS>
Password: <ENTER PASSWORD>
Password (again): <ENTER PASSWORD AGAIN>
Superuser created successfully.
Installing custom SQL ...
Installing indexes ...
Installed 0 object(s) from 0 fixture(s)

你可能会询问是否创建一个超级账户,就像上面的例子中那样。在本指南的后续部分会使用超级账户来访问Django管理接口,所以还是建议你克服困难创建一个帐号(so we recommend that you bite the bullet and set up an account now)。输入yes,然后输入用户名,邮箱和密码。做完这些,脚本成功退出。切记要记下超级账户的用户名和密码。

当这个过程结束后,你将会在工程目录中看到一个名为rango.db的文件。

5.5. Generated SQL

数据库同步过程本质上就是把Django模型转成SQL表。可以运行python manage.py sql rango来查看生成的SQL。它会输出与使用的数据库相关的SQL语句。注意,虽然我们没有在模型中指定id属性,Django会自动给每个模型分配一个id。你还会注意到表rango_pageCategory被指定为外键。

BEGIN;
CREATE TABLE "rango_category" (
    "id" integer NOT NULL PRIMARY KEY,
    "name" varchar(128) NOT NULL UNIQUE
)
;
CREATE TABLE "rango_page" (
    "id" integer NOT NULL PRIMARY KEY,
    "category_id" integer NOT NULL REFERENCES "rango_category" ("id"),
    "title" varchar(128) NOT NULL,
    "url" varchar(200) NOT NULL,
    "views" integer NOT NULL
)
;

COMMIT;

既然Django在数据库之上提供了一层封装,我们需要关注的就是模型。不过,如果你愿意你还是可以直接在数据库中执行SQL命令。细节见Official Django Documentation on running custom SQL

5.6. Django模型与Django Shell

在我们把注意力转移到Django admin接口之前,值得注意的是你可以通过Django shell访问Django模型——非常有助于调试。我们会通过创建一个Category实例来说明这个方法。

在Django工程的根目录再次调用manage.py来进入shell。运行下面的命令。

$python manage.py shell

这会启动一个Python解释器的实例,并加载工程的设置。之后你就能够与模型互动了。下面的例子中终端的输入说明了这个功能。行间的注释说明了每个命令是做什么的。

# Import the Category model from the Rango application
>>> from rango.models import Category

# Show all the current categories
>>> print Category.objects.all()
[] # Returns an empty list (no categories have been defined!)

# Create a new category object, and save it to the database.
>>> c = Category(name="Test")
>>> c.save()

# Now list all the category objects stored once more.
>>> print Category.objects.all()
[<Category: test>] # We now have a category called 'test' saved in the database!

# Quit the Django shell.
>>> quit()

在这个例子中,我们首先导入了需要处理的模型。然后输出所有存在的分类,当然了没有分类输出因为我们的表是空的。之后,我们创建并保存了一个分类,然后再次输出所有分类。第二个print应该会输出刚刚添加的Category

5.7. 配置管理接口

Django的一个牛比特性就是提供了一个内置的,基于网页的管理接口,通过这个接口我们可以浏览修改模型相应的表中的数据。跟其他做法一样,在我们能够使用管理接口之前我们需要配置它。

首先,打开工程文件setings.py。这个文件位于工程配置目录。在这个文件中,找到INSTALLED_APPS元组,取消掉django.contrib.admin之前的注释。现在元组看起来应该是下面这个样子。看下行间的注释不难找到取消注释的行。

INSTALLED_APPS = (
    'django.contrib.auth',
    'django.contrib.contenttypes',
    'django.contrib.sessions',
    'django.contrib.sites',
    'django.contrib.messages',
    'django.contrib.staticfiles',
    # Uncomment the next line to enable the admin:
    'django.contrib.admin', # THIS LINE SHOULD NOW BE UNCOMMENTED
    # Uncomment the next line to enable admin documentation:
    # 'django.contrib.admindocs',
        'rango',
)

做好了这些,保存文件并同步数据库。需要做这些是因为django.contrib.admin应用需要表来完成功能。要同步数据库,再次运行命令syncdb

$ python manage.py syncdb

你应该会看到表django_admin_log已经创建好了。一旦完成,打开工程的urls.py文件。这个文件位于工程配置目录。在这个文件里面,首先取消导入语句后面的两行。还要保证URL模式/admin/存在,并指向admin.site.urls模块,像下面这样。

from django.conf.urls import patterns, include, url
from django.conf import settings

# Uncomment the next two lines to enable the admin:
from django.contrib import admin # UNCOMMENT THIS LINE
admin.autodiscover() # UNCOMMENT THIS LINE, TOO!

urlpatterns = patterns('',
        url(r'^rango/', include('rango.urls')),
        url(r'^admin/', include(admin.site.urls)), # ADD THIS LINE
        )

if settings.DEBUG:
        urlpatterns += patterns(
                'django.views.static',
                (r'media/(?P<path>.*)',
                'serve',
                {'document_root': settings.MEDIA_ROOT}), )

快完成了!接下来,我们需要告诉Django的admin应用有哪些模型需要通过admin接口来访问。要完成这些,我们需要在rango应用目录下创建一个名为admin.py的文件。添加下面的代码到这个文件中。

from django.contrib import admin
from rango.models import Category, Page

admin.site.register(Category)
admin.site.register(Page)

它将模型注册到了管理接口中。如果我们还有其他的模型,我们只要简单的将模型作为参数来调用admin.site.register()

做好了所有这些修改,启动或者重启Django开发服务器,访问http://127.0.0.1:8000/admin/。你应该会看到一个登录框,需要输入用户名和密码。输入设置数据库时创建的超级帐号的用户名和密码,你会看到一个如图2所示的网页。

ch5-rango-admin-models

点击Rango部分的Category链接。从这里,你应该能看到之前通过Django shell创建的test分类。试着删除分类,因为我们接下来会通过一个填充脚本来填充数据库。这个接口易于使用。花几分钟来创建,修改以及删除分类和页面。你还可以在Auth应用的User中添加用户,让他能够登录到工程的管理接口。

5.8. 创建填充脚本

在课程的开发过程中,非常可能在某个时间点需要修改Django模型。当你需要这么做时,最简单的选择——不使用外部工具|局势重建整个数据库并运行python manage.py syncdb…!由于这项工作非常单调,一个不错的做法就是为数据库创建一个脚本,我们称之为填充脚本(population script)。这个脚本用来自动填充测试数据,这无形中节省你大量的时间。

要创建Rango数据库的填充脚本,我们在Django工程根目录(例如<workspace>/tango_with_django_project/)中创建了一个python模块。新建文件populate_rango.py,添加下面的代码。

import os

def populate():
    python_cat = add_cat('Python')

    add_page(cat=python_cat,
        title="Official Python Tutorial",
        url="http://docs.python.org/2/tutorial/")

    add_page(cat=python_cat,
        title="How to Think like a Computer Scientist",
        url="http://www.greenteapress.com/thinkpython/")

    add_page(cat=python_cat,
        title="Learn Python in 10 Minutes",
        url="http://www.korokithakis.net/tutorials/python/")

    django_cat = add_cat("Django")

    add_page(cat=django_cat,
        title="Official Django Tutorial",
        url="https://docs.djangoproject.com/en/1.5/intro/tutorial01/")

    add_page(cat=django_cat,
        title="Django Rocks",
        url="http://www.djangorocks.com/")

    add_page(cat=django_cat,
        title="How to Tango with Django",
        url="http://www.tangowithdjango.com/")

    frame_cat = add_cat("Other Frameworks")

    add_page(cat=frame_cat,
        title="Bottle",
        url="http://bottlepy.org/docs/dev/")

    add_page(cat=frame_cat,
        title="Flask",
        url="http://flask.pocoo.org")

    # Print out what we have added to the user.
    for c in Category.objects.all():
        for p in Page.objects.filter(category=c):
            print "- {0} - {1}".format(str(c), str(p))

def add_page(cat, title, url, views=0):
    p = Page.objects.get_or_create(category=cat, title=title, url=url, views=views)[0]
    return p

def add_cat(name):
    c = Category.objects.get_or_create(name=name)[0]
    return c

# Start execution here!
if __name__ == '__main__':
    print "Starting Rango population script..."
    os.environ.setdefault('DJANGO_SETTINGS_MODULE', 'tango_with_django_project.settings')
    from rango.models import Category, Page
    populate()

虽然代码看起来有很多,不过做的事情却相对简单。因为我们在文件开头定义了一系列函数,代码从结尾开始执行|找到这一行if __name__ == '__main__'。然后导入Rango的设置和模型Category以及Page,最后调用函数populate()

函数populate()会调用函数add_cat()add_page(),这两个函数分别负责创建新分类和新页面。当我们创建单独的Page模型实例并保存到数据库时,populate()会保存分类的标签。最后,遍历模型CategoryPage,输出所有的Page实例和相应的分类。

注意——我们使用的简便的函数get_or_create()来创建模型实例。关于这个函数的细节查阅官方文档。那里会解释为什么在返回值中传递索引[0]

保存,把目录改到工程根目录运行脚本,通过命令$ python populate_rango.py执行模块。你应该会看到类似下面的输出。

$ python populate_rango.py
Starting Rango population script...
- Python - Official Python Tutorial
- Python - How to Think like a Computer Scientist
- Python - Learn Python in 10 Minutes
- Django - Official Django Tutorial
- Django - Django Rocks
- Django - How to Tango with Django
- Other Frameworks - Bottle
- Other Frameworks - Flask

现在检查下填充脚本是否填充了数据库。重启Django开发服务器,导航到管理接口,并检查是不是多了一些新分类和页面。如果你点击Page,你看到类似图3的所有页面了么?

ch5-rango-admin

虽然写填充脚本会费些时间,但是如果你改变了模型,你会非常庆幸你写了它。当你更新模型的时候记得更新填充脚本——你不会想要它们之间互不一致。

5.9. 基本流程

目前我们已经介绍了Django模型的主要部分,现在是时候总结下整个过程了。我们将核心任务分成了不同的部分。

5.9.1. 建立数据库

在一个新Django工程中,你首先告诉Django打算使用的数据库(即,在setting.py中配置DATABASES)。不这么干,Django不知道在哪里存储数据。你还可以启用管理接口来简化操作——注意,如果你不想,可以禁用。

5.9.2. 添加模型

添加模型的流程可以分为5个步骤。

  1. 首先,在Django应用的models.py文件中新建model(s)。
  2. 创建好模型,如果你使用管理接口,那么重新配置管理接口将模型包含进去。
  3. 通过命令$ python manage.py syncdb同步或者重新同步数据库。这会在数据库中为新模型创建必须的结构。
  4. 新建填充脚本,并运行。

注意syncdb命令的使用事项。这个命令只用于添加新模型到数据库中|如果你想修改已有的模型,你必须重新创建数据库。

5.10. 练习

20131124@深圳 南山